A rear swing arm suspension is an excellent addition to any DIY go-kart, especially if you want to tackle rough terrain with better handling and comfort. This design is straightforward yet effective, offering a great balance of simplicity and performance. Let’s dive into the key aspects of building one and how to get started.
What is a Rear Swing Arm Suspension?
At its heart, the rear swing arm suspension involves a pivoting arm that holds the rear axle and sometimes the engine. This arm moves up and down, dampened by one or more shock absorbers to reduce the impact of bumps. It’s a popular choice for DIY go-karts because of its relatively simple design and ability to handle off-road conditions.
The swing arm pivots at a single point attached to the chassis. This setup ensures the axle remains aligned while allowing the arm to absorb vertical movement. Shock absorbers are mounted between the arm and the frame, ensuring a smoother ride by controlling how the suspension compresses and rebounds.
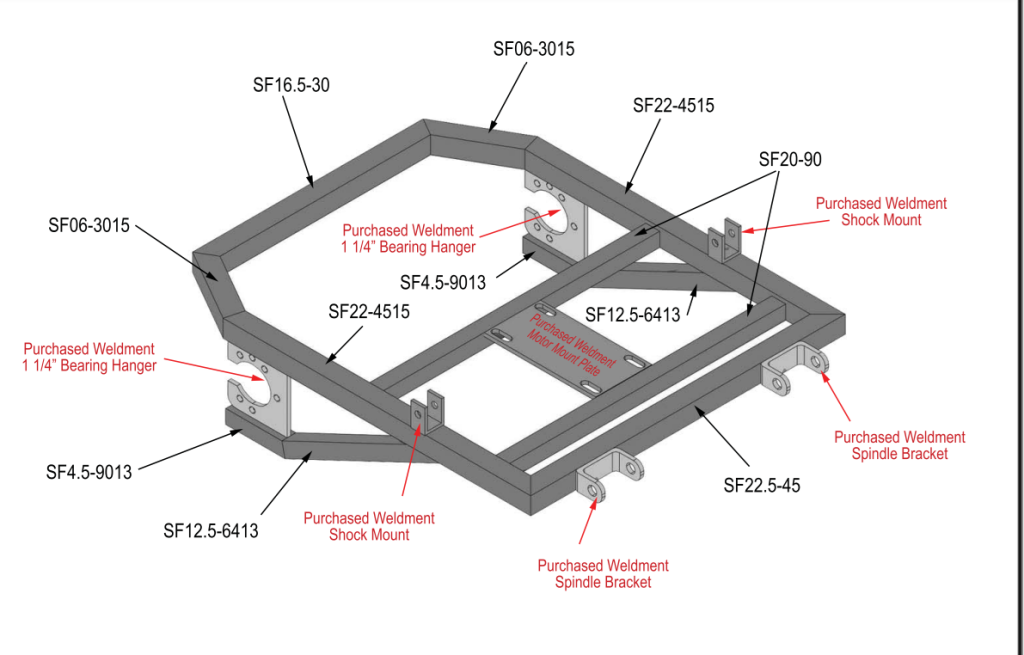
Our Arachnid go kart has a great rear swing arm – here is a blueprint of that design.
The Theory of Suspension: Sprung vs Unsprung Weight
The balance between sprung and unsprung weight is a critical factor in suspension design, particularly for vehicles like go-karts that navigate varying terrain. Sprung weight refers to the mass supported by the suspension system, such as the chassis, engine, and driver. Unsprung weight, on the other hand, includes components directly in contact with the ground, such as the wheels, tires, and axle. Minimizing unsprung weight is essential because it directly affects how quickly the suspension can respond to surface irregularities. A lighter unsprung weight allows the tires to maintain better contact with the ground, improving traction, stability, and handling. In a rear swing arm suspension, keeping unsprung weight low is especially important since the axle and sometimes the engine are part of the moving assembly. Balancing these weights ensures that the suspension can efficiently absorb shocks without overburdening the system or compromising performance, resulting in a smoother and more controlled ride.
Why Choose a Rear Swing Arm?
If you’re weighing your options for a suspension system, the rear swing arm stands out for several reasons. First, it’s much simpler to design and build compared to independent suspension setups. It’s also durable, with fewer moving parts that might fail or need maintenance. Finally, it offers excellent traction on rough terrain, as the suspension keeps the rear wheels in better contact with the ground.
For go-kart builders who prioritize ease of construction and reliability, the rear swing arm is a natural choice. Plus, its cost-effectiveness makes it accessible for those working within a tight budget.
Designing and Building the Swing Arm
Start by fabricating the swing arm itself. Steel tubing is a common material due to its strength and ease of welding. Your swing arm will need mounting points for the rear axle, shocks, and potentially the engine. Pay close attention to the arm’s length—it should be long enough to allow smooth motion but not so long that it strains the pivot point.
The pivot point is crucial. It connects the swing arm to the chassis and bears most of the suspension’s load. Reinforce this area to handle stress, and use bushings or bearings for smooth movement. Ensure the pivot bolt is secure but not overly tight, as this could restrict motion.
Mounting the Shock Absorbers
Shock absorbers are the heart of the suspension system. They control how the swing arm reacts to bumps, ensuring the kart remains stable and comfortable. When installing shocks, position them at an angle to maximize their efficiency and range of motion. Adjustable shocks are ideal, as they allow you to tweak the suspension based on your kart’s weight and intended use.
If your engine will be mounted on the swing arm, ensure the shock placement compensates for the added weight. This setup can simplify chain alignment, as the engine moves with the axle, keeping tension consistent.
Final Steps: Axle Alignment and Testing
Once the swing arm and shocks are in place, install the rear axle and ensure it’s perfectly aligned with the chassis. Misalignment can cause handling issues and uneven tire wear, so take your time to get this right. With the axle secure, test the suspension by pushing down on the swing arm. It should compress smoothly and return to its resting position without bouncing excessively.
Take your kart for a test drive on varying terrain to fine-tune the setup. Adjust the shocks as needed to achieve the right balance between comfort and control.